
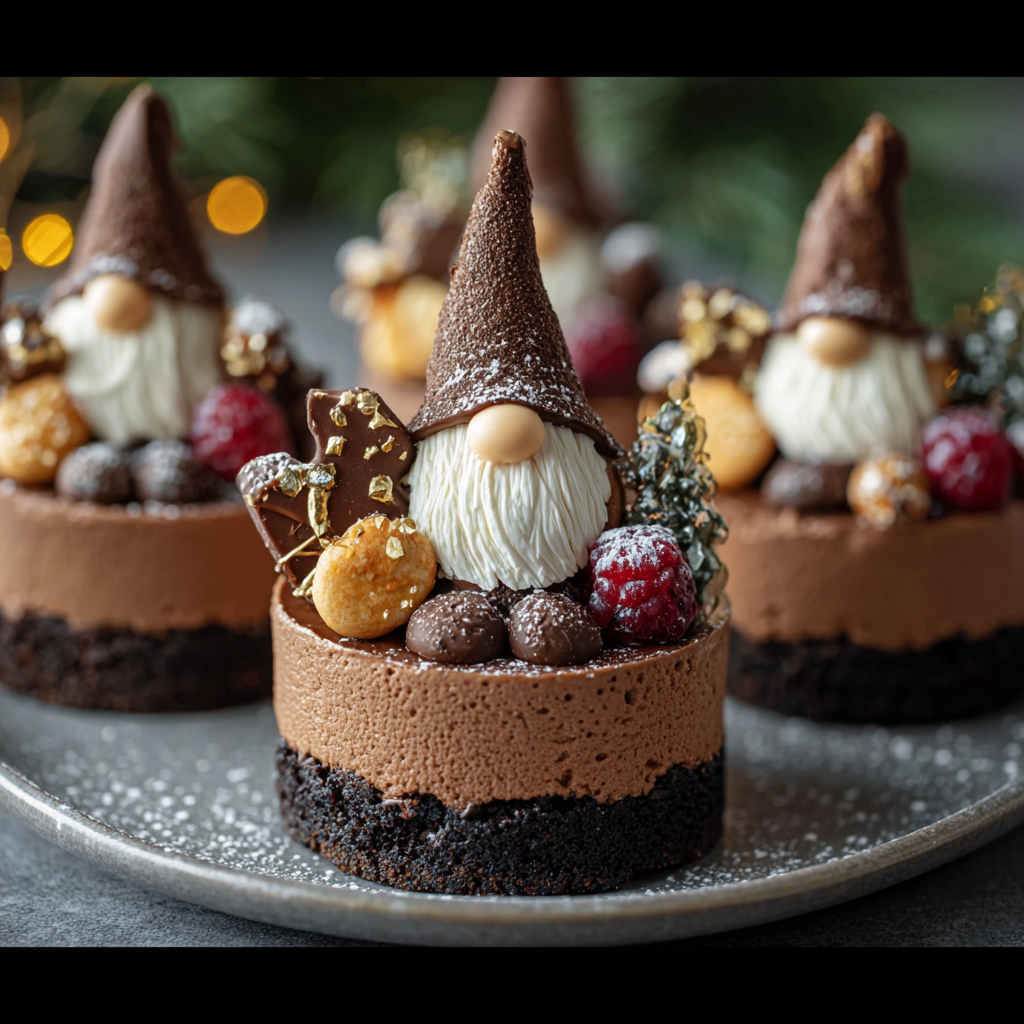
Chocolate Gnome Cheesecakes

Mini chocolate cheesecakes decorated as whimsical gnomes — creamy, chocolatey, and perfect for parties or cozy dessert moments.

Why You'll Love This Recipe
- These are individual, bite-sized treats that are easy to portion and perfect for parties or gifting; a batch makes about eight mini cheesecakes using a standard muffin tin.
- Ready for serving in under two hours with minimal hands-on time: about 25 minutes of prep and 20 minutes of baking, plus chilling, so you can prep ahead and decorate just before serving.
- Uses pantry staples like cookie crumbs, cream cheese, and semi-sweet chocolate; no need for specialty ingredients, and substitutions are straightforward for dietary tweaks.
- Decorating is flexible — use strawberries, chocolate cones, or simple piped frosting for hats; the design is forgiving so even beginners can achieve cute results.
- Make-ahead friendly: they keep well refrigerated for several days and freeze beautifully for longer storage without losing texture.
I discovered a few small tricks while developing this version: slightly underbaking and a long chill time gives the silkiest texture, and warming the ganache just enough makes hat assembly quick. My family laughed when they saw the first batch because the gnomes look so cheerful, and my friends started requesting them for every holiday since.
Ingredients
- Chocolate cookie crumbs (Crust): Use one cup of finely crushed chocolate sandwich cookies (Oreos without the filling work fine) for a rich base. The fine crumbs compact better and provide a sturdier shell; for convenience use pre-made cookie crumbs or pulse whole cookies in a food processor.
- Unsalted butter (Crust): Three tablespoons melted to bind the crumbs. Unsalted allows you to control salt; if using salted butter, reduce added salt elsewhere.
- Cream cheese (Filling): Two 8-ounce blocks (16 ounces total), softened to room temperature. Full-fat cream cheese gives the best texture and flavor; Philadelphia is a reliable brand but any high-quality block cream cheese will work.
- Granulated sugar (Filling): Half a cup to balance the tang of the cream cheese. Brown sugar adds a caramel note if you prefer a deeper flavor.
- Sour cream or Greek yogurt (Filling): Half a cup for creaminess and a subtle tang; sour cream yields the smoothest mouthfeel, Greek yogurt is a lighter swap.
- Vanilla extract (Filling): One teaspoon for aroma and balance; pure vanilla extract is worth the extra flavor.
- Eggs (Filling): Two large eggs to set the filling and add structure; room temperature eggs incorporate more evenly.
- Melted semi-sweet chocolate (Filling): Half a cup of melted chocolate folded into the batter for deep chocolate flavor and a fudgy texture.
- Chocolate ganache or melted chocolate (Decorations): Three quarters cup to form hats; ganache made from equal parts chocolate and cream yields a glossy finish.
- Whipped cream or frosting (Beards): Use store-bought or homemade stabilized whipped cream for piping beards that hold shape.
- Mini candy-coated chocolates or white chocolate chips (Noses): Small candies make charming noses; use what you have on hand.
- Strawberries or chocolate cones (Optional hats): For an alternative hat shape and fresh flavor, halved strawberries or small chocolate-dipped cones work well.
- Powdered sugar: For a light dusting of “snow” and visual contrast.
Instructions
Prepare the crust: Preheat the oven to 325°F. Line a 12-cup muffin tin with 8 liners for larger minis or use 12 for smaller portions. Combine 1 cup chocolate cookie crumbs with 3 tablespoons melted unsalted butter until evenly moistened. Press about one to one and a half tablespoons of the crumb mixture into the base of each liner, compacting with the back of a small spoon or a measuring cup for a firm base. Bake for 5 minutes to set, then remove and cool slightly. Make the filling: Beat 16 ounces softened cream cheese with 1/2 cup granulated sugar until smooth and lump-free, scraping the bowl. Blend in 1/2 cup sour cream and 1 teaspoon vanilla. Add two large eggs one at a time, mixing gently until incorporated — avoid overbeating to prevent cracks. Fold in 1/2 cup melted semi-sweet chocolate at room temperature until you have an even chocolate batter. Assemble and bake: Spoon the batter over the prepared crusts, filling cups about three quarters full. Tap the tin gently to release air bubbles. Bake at 325°F for 18 to 22 minutes; centers should still have a slight wobble. Remove from oven and let cool on a wire rack for 30 minutes before transferring to the refrigerator to chill for at least 2 hours, ideally overnight for best texture. Chill and set: Chill fully until the filling firms; chilling also enhances flavor contrast. If time is tight, pop them into the freezer for 30 minutes, but allow a final 15 minutes at fridge temperature before decorating to avoid condensation forming on the ganache. Decorate as gnomes: Warm 3/4 cup ganache or melted chocolate until pourable but not hot (microwave in 10-second bursts and stir). Pipe or spoon small hats on top of each mini cheesecake. Use whipped cream or frosting to pipe beards under the hat brim, and place a mini candy or white chip as the nose. For hats, halve small strawberries or press mini chocolate cones into the ganache. Dust lightly with powdered sugar for a snowy finish. Serve: Keep chilled until serving; these are best eaten cold. Bring them out 10 minutes before serving to soften slightly for the creamiest bite.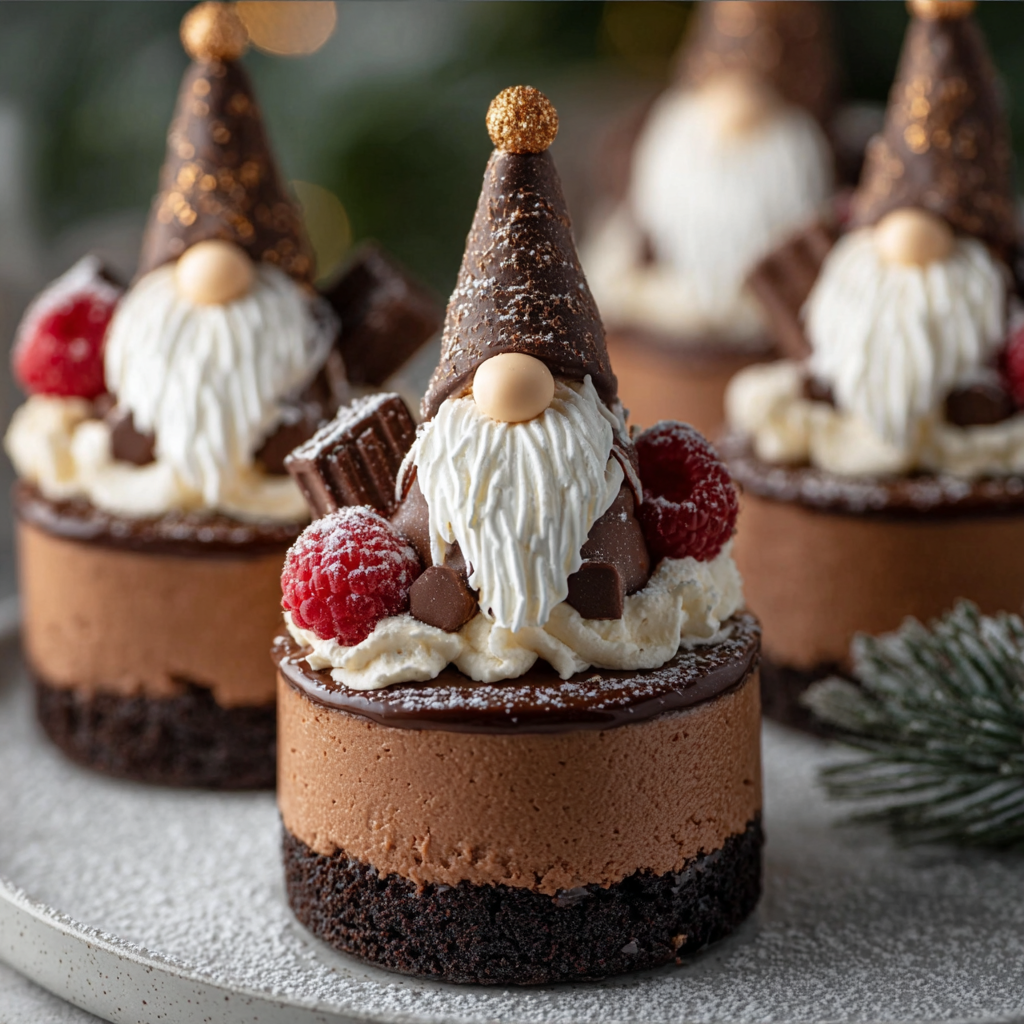
You Must Know
- These hold in the refrigerator for up to 4 days in an airtight container; they also freeze well for up to 3 months if wrapped tightly.
- Chilling is essential: at least 2 hours is required for proper set and flavor melding; overnight yields the creamiest texture and cleanest slices.
- High in dairy and eggs — expect a rich, calorie-dense treat; serving sizes should be modest for richer gatherings.
- Use room-temperature ingredients for a lump-free batter and smoother texture; cold cream cheese is the most common culprit for uneven fillings.
My favorite part is how each gnome feels slightly different depending on the decorations — one batch I made had chocolate cone hats and strawberry noses and they disappeared first. These mini cheesecakes always spark conversation, and making them has become a small holiday tradition when friends come by for cocoa and board games.
Storage Tips
Store finished cheesecakes in a single layer in an airtight container in the refrigerator for up to four days. If stacking, place parchment paper between layers to protect the decorations. For longer storage, freeze on a tray until solid and then move to a freezer-safe container; thaw in the refrigerator overnight before serving. To refresh slightly after refrigeration, leave them at room temperature for 10 minutes for a softer bite. Avoid leaving decorated cheesecakes at room temperature for more than two hours.
Ingredient Substitutions
Swap sour cream for full-fat Greek yogurt for a tangy but lighter option, or use crème fraîche for an ultra-rich mouthfeel. For a gluten-free crust, use gluten-free chocolate sandwich cookies or a mixture of almond flour and cocoa powder with added sweetener; note the texture will be crumbly but flavorful. Dark chocolate can replace semi-sweet for a more intense cocoa note; reduce sugar slightly if using very dark chocolate. For a dairy-free version, replace cream cheese with a firm vegan block and use coconut cream in place of sour cream — texture will be slightly different, but flavors remain festive.
Serving Suggestions
Serve these as a whimsical dessert at holiday gatherings, at a winter-themed baby shower, or alongside hot coffee and tea for a cozy afternoon treat. Pair with tart raspberries, salted caramel drizzle, or a simple berry compote to cut the richness. For a plated dessert, add a mint leaf and a few fresh berries for color contrast. They also make charming edible place settings at a dinner party: tie a small name tag to each liner for a playful touch.
Cultural Background
While individual cheesecakes have roots in ancient Greece, modern baked cheesecakes as we know them were popularized in America and Europe. Miniature versions and playful seasonal decorations have become a hallmark of contemporary home baking, where appearance and portion control matter. Dressing desserts as characters—gnomes in this case—draws on the European folklore of garden gnomes and winter iconography, pairing culinary creativity with nostalgic motifs to create memorable, shareable treats.
Seasonal Adaptations
In summer, swap the ganache hats for fresh berry halves and lighten the filling with Greek yogurt. For a festive winter version, add a pinch of cinnamon and orange zest to the filling and use spiced cookie crumbs for the crust. At Halloween, use dark chocolate cones and orange-tinted frosting for spooky gnomes. For spring gatherings, garnish with edible flowers and pastel candy noses for a garden-party vibe.
Meal Prep Tips
Make the crust and filling one day ahead; bake and chill overnight, then decorate the day of your event to keep hats and beards crisp. Store decorations separately in small containers so you can quickly assemble just before guests arrive. If transporting, pack chilled cheesecakes in a cooler with ice packs and assemble delicate decorations on-site to avoid melting. Use disposable piping bags for quick cleanup when piping beards.
These Chocolate Gnome Cheesecakes strike the perfect balance between whimsical presentation and dependable flavor. They’re approachable for home bakers, adaptable for dietary needs, and guaranteed to bring a smile — try them at your next gathering and make the gnomes your own.
Pro Tips
Use room-temperature cream cheese and eggs for a lump-free filling.
Press the crust firmly to create a compact base that holds the filling.
Avoid overmixing after adding eggs to prevent a grainy texture and cracks.
Chill fully — a well-chilled cheesecake slices cleaner and holds decorations better.
This nourishing chocolate gnome cheesecakes recipe is sure to be a staple in your kitchen. Enjoy every moist, high protein slice — it is perfect for breakfast or as a wholesome snack any time.
FAQs about Recipes
Can I make these ahead of time?
Yes. Chill at least 2 hours, but overnight is best for texture and flavor.
How long do they keep in the freezer?
Freeze on a tray until solid, then transfer to a freezer-safe container for up to 3 months. Thaw in fridge overnight.
Should I let them sit before serving?
Room temperature for about 10 minutes to soften slightly before serving.
Tags
Chocolate Gnome Cheesecakes
This Chocolate Gnome Cheesecakes recipe makes perfectly juicy, tender, and flavorful steak every time! Serve with potatoes and a side salad for an unforgettable dinner in under 30 minutes.
Ingredients
Crust
Filling
Decorations
Instructions
Prepare the crust
Preheat oven to 325°F. Line a muffin tin and press 1 to 1.5 tablespoons of cookie crumb mixture into each liner. Bake 5 minutes and cool slightly.
Make the filling
Beat softened cream cheese with sugar until smooth. Mix in sour cream and vanilla, then add eggs one at a time. Fold in melted semi-sweet chocolate until uniform.
Assemble and bake
Fill liners three quarters full, tap to remove air, and bake 18 to 22 minutes until centers wobble slightly. Cool and refrigerate for at least 2 hours.
Chill and set
Allow to chill until firm. For speed, freeze 30 minutes but allow a brief fridge rest before decorating to avoid condensation.
Decorate as gnomes
Warm ganache and add hats. Pipe whipped cream beards and press a small candy for the nose. Dust with powdered sugar before serving.
Serve
Keep chilled until serving. Bring to room temperature for 10 minutes if you prefer a softer texture; otherwise serve cold.
Last Step: Please leave a rating and comment letting us know how you liked this recipe! This helps our business to thrive and continue providing free, high-quality recipes for you.
Nutrition
Did You Make This?
Leave a comment & rating below or tag
@solushcooks on social media!
Categories:
You might also like...

Air-Fried Pizza Rolls
Crispy, golden pockets of melted mozzarella and pepperoni made in the air fryer for a quick party snack or weeknight treat.

Air-Fried Rice Paper Noodle Rolls
Crispy, light rice paper rolls filled with vermicelli, vegetables and tofu or shrimp, finished in the air fryer for a healthy, snackable treat.
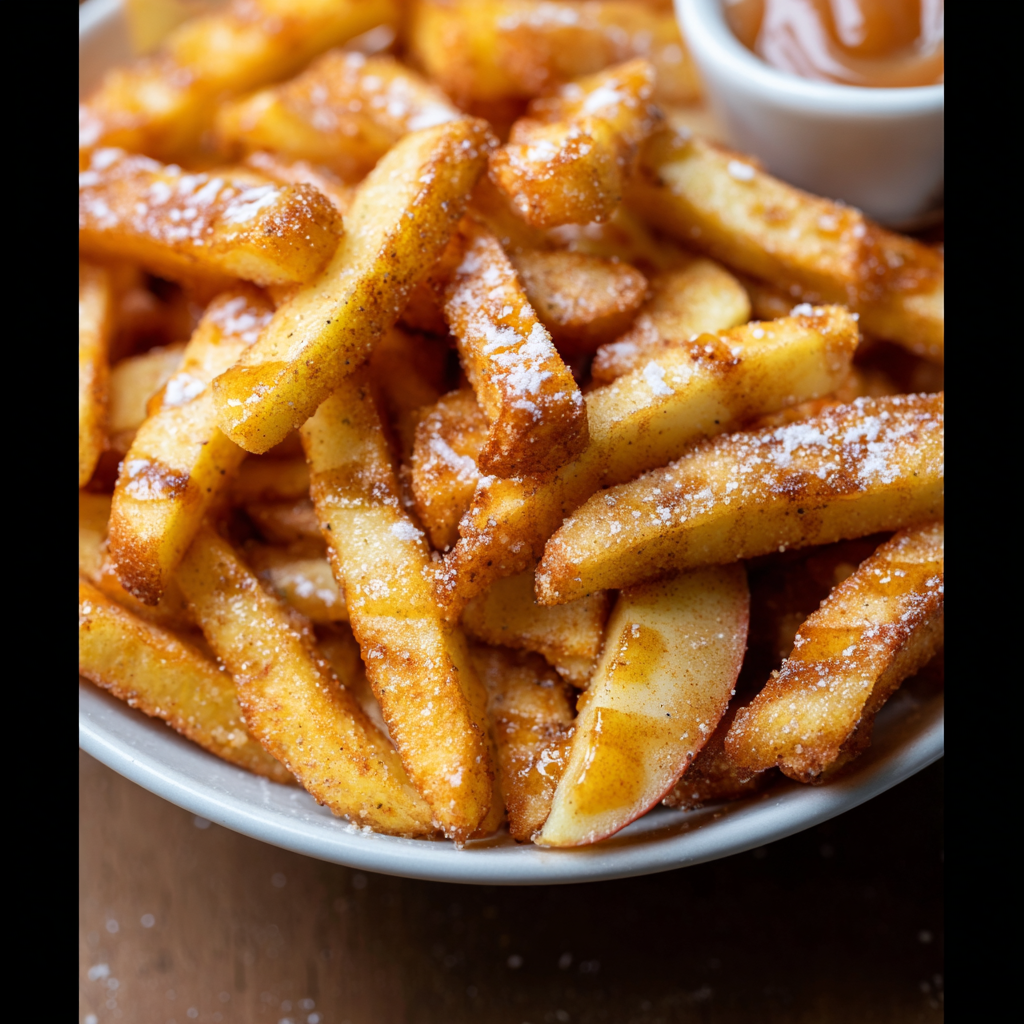
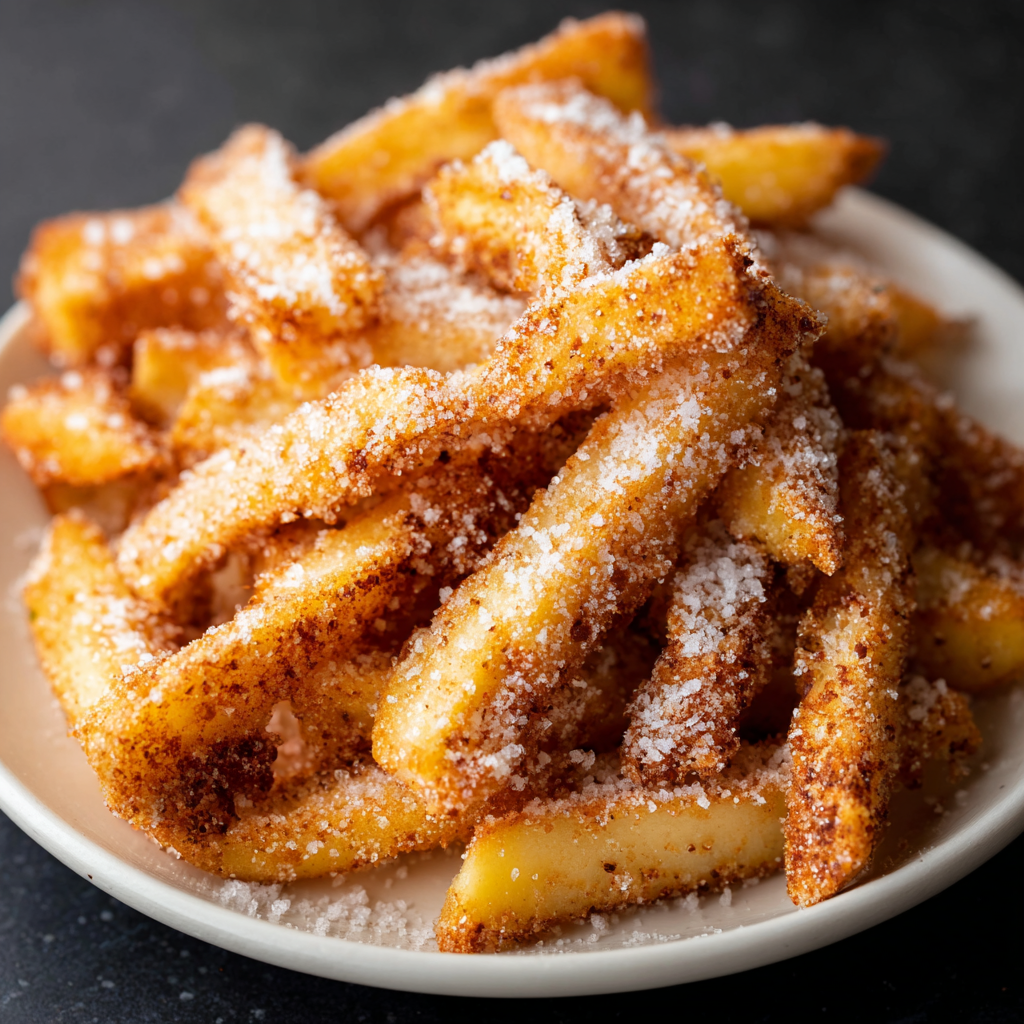
Air Fryer Apple Fries
Crispy, cinnamon-sugar coated apple fries made in the air fryer — a quick, family-friendly snack or dessert ready in under 30 minutes.
Did You Make This?
Leave a comment & rating below or tag @solushcooks on social media!
Rate This Recipe
Share This Recipe
Enjoyed this recipe? Share it with friends and family, and don't forget to leave a review!
Comments (1)
This recipe looks amazing! Can't wait to try it.
Comments are stored locally in your browser. Server comments are displayed alongside your local comments.

Hi, I'm Lena!
What's Popular
30-Minute Meals!
Join to receive our email series which contains a round-up of some of our quick and easy family favorite recipes.